
By now, following the previous two posts in this series, you have setup the methods that initialize a Chrome and a Firefox browser. In this post, you will see how to use System properties for easily switching the browser in tests.
2.3. Creating the method for starting a browser based on a parameter
Not hardcoding the browser in your tests is the best option to choose from. It gives you flexibility in terms of running the same test, with a single small change, across all your supported browsers. The small change i am referring to involves a System property, whose value will say which browser the test is currently running on. The idea is that, right before a test is about to run, the tester sets a value to this property, corresponding to what browser they want the test to run on.
This mechanism needs to be implemented in your tests project. Otherwise said: you will need to create a separate browser instantiation method, similar to those for Chrome and Firefox, but with some additional logic. It needs to identify the value of the System property which says what browser to run the tests on, and based on that value, it will start up the corresponding browser. So there are two points we need to address here: how will the System property be set, and what does the browser initialization method look like?
Let’s start with the first one, namely setting the System property. Let’s say, for the sake of example that the name of this property is ‘browser’. There are several ways of setting this System property. I will start with the one i do not recommend, and i will also tell you why. You can create a property file (which is nothing more than a text file, with ‘key’ = ‘value’ pairs of text, and with a .properties extension). Then, in the browser initialization method, the value corresponding to the ‘key’ property is read from this file, which will give the name of the browser needed in the test. Such a key/value pair from this file would look something like:
browser=Chrome
This means that whenever somebody needs to change the browser on which the test runs, they will just change the value in this file, before starting the test run. It sounds rather simple. However there is a disadvantage with this approach: the person running this test is not the only person who needs to work on this project. There are surely at least two testers who need to work with the same code, and who need to start the browser, for running some tests (maybe not the same tests as the first tester). And since testers will also use a Version Control System, the same file could be committed with different values for the browser property, whenever one of the people running the tests will change its’ value.
This might not be a significant disadvantage, unless you need to make sure you run certain tests on certain browsers, which will lead to you constantly checking the values from the property file, to make sure they are the expected ones. The huge disadvantage however can be observed if the same tests need to be run on a CI. If you have several CI jobs where the same tests need to be run, but on a different browser, you cannot do this, since the CI jobs will pull the content from the Version Control repository for each job (ideally, since you always want to run the latest version of your test code). Once the property file is committed with a value for the browser, all the CI jobs started after that, which pull code from the repository, will use that particular value. This makes all your tests dependent on this file, and any change in the file will affect all the CI jobs, even those you do not want to affect.
The better alternative is to provide the browser name as a System property, which can be provided via the IDE or via the command line, depending on how the test will be run. With this approach, in the CI you can have a job that runs a test on a browser, but also a different job that runs the same test on a different one.
2.3.1. Setting the property from the IDE
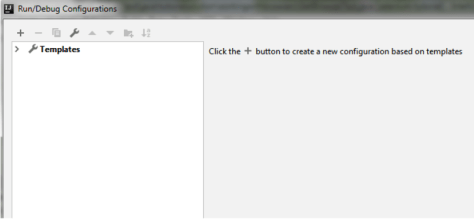
When you are running the tests directly from the IDE (not from the command line), the ‘browser’ System property can easily be set from the ‘Run/Debug Configurations’ screen (don’t forget i am referring to IntelliJ in this post). On the top right side of the IDE screen, you will find the Configurations section, which, if it hasn’t been accessed before, displays the ‘Add Configuration…’ label.

Clicking on the label will open the editing screen. From there you can change certain aspects of running the tests, by setting certain values of certain attributes from the Templates created in the IDE. First you need to click on the ‘Templates’ label.
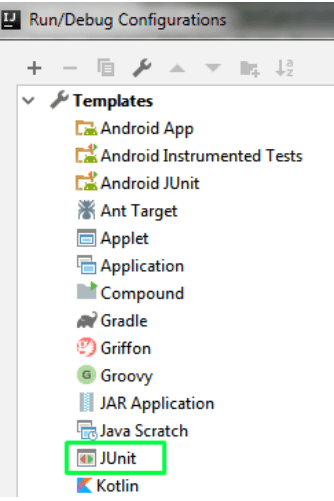
This will open the left hand menu, where you can see different technologies to change the settings for, including JUnit. Since i am using JUnit, this is the template that needs to changed in order to set the ‘browser’ property, by clicking on the ‘JUnit’ label.
 This will open the edit section on the right hand side of the already opened screen. The only field you are interested in at this point is the ‘VM options’ one.

In this field, you only need to type ‘-Dbrowser=nameOfDesiredBrowser’. ‘-D’ signals that you want to set a property, whose name is typed right after ‘-D’. In this example, the name of the property you are setting is ‘browser’. The value of the property is the text after the ‘=’ character. So, for example, if you want to run your tests on Chrome, you can type ‘-Dbrowser=Chrome’ into the ‘VM options’ field.

As you can see in the browser initialization method code, if you want to start the Chrome browser, you don’t need to type the name of the browser with specific case. Whether a letter is in upper case or lower case, that does not matter, since the browser initialization method knows how to deal with the case. It is however important that the part before the ‘=’ is written exactly as in the screenshot above.
After setting the value of the ‘browser’ property, click the ‘Apply’, then the ‘OK’ buttons. Every test that will run from the moment you set this property will have access to this property if it needs it. That means, that if you have some tests where the browser is hardcoded, you are not interested in this property, but it is still available to the tests (without influencing their run, since the hardcoded browsers are initialized by methods that do not check the value of this property). All those tests that will use the browser initialization method based on a System property will also have access to it, and will use it to create the browser instance specified by this property.
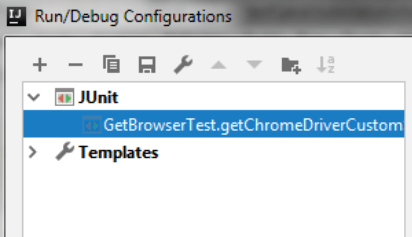
If you want to change the browser so that any future test runs on a different browser, you can again open the Configurations screen. If you already ran some tests, you will notice that on the left side, in the menu, above the ‘Templates’ menu entry you have another menu entry called ‘JUnit’. If you expand this menu item, you will have some other entries as part of this one. Their name corresponds to the test classes or test methods you already ran. Now, if you only want to change the browser for one or several (but not all) of these entries (test methods or test class), you can just: click on the corresponding entries, edit the value of the browser name, and click the Apply and OK buttons. This way, only the newly changed methods or classes will use the new browser you specified, while the remaining ones, and any future ones, will use the value set at the beginning, in the Templates section.
What happens if you want every test that runs from now on to use a different browser, even those which are already displayed in the menu, under the ‘JUnit’ menu entry? In order to change the browser, you first need to delete all these entries from the ‘JUnit’ menu entry (the one above the ‘Templates’ menu entry), by clicking the ‘-’ icon for each entry.
Once that is done, you need to go back to the Template entry corresponding to JUnit, and just change the name of the browser to the one you need, click Apply and click OK, then just run your tests.
2.3.2. Setting the property from the command line
If you are running your tests via Maven and the command line, either on your local machine or on a remote CI, you will have to type a specific command, along the lines of:
mvn test ...
Of course you can specify all kinds of other aspects in the command. Here you will specify what the browser should be, for those tests which will need to start a browser based on the ‘browser’ property. Similarly to what you needed to type in the IDE VM options field, in the command line you will need to add the following text to your command: ‘-Dbrowser=browserName’. Therefore, the command for running tests will become, for Chrome:
mvn test -Dbrowser=Chrome ...
Or, for Firefox:
mvn test -Dbrowser=Firefox ...
2.3.3. The browser initialization method
The method used for starting the browser based on the value of the ‘browser’ System property that you now set, can be found here, and is explained right after the code:
public WebDriver getDriver() {
        switch (System.getProperty("browser").toLowerCase()) {
            case "chrome" :
                System.out.println("Chrome was chosen!");
                return getChromeDriver();
            case "firefox" :
                System.out.println("Firefox was chosen!");
                return getFirefoxDriver();
            default:
               throw new RuntimeException("Unsupported browser!
                                   Will not start any browser!");
        }
    }
This method returns a WebDriver instance. This can be, in this example, either a Chrome or Firefox instance, which is possible since WebDriver is the interface implemented by both ChromeDriver() (used for starting Chrome) and FirefoxDriver() (used for starting Firefox).
Retrieving the value of the system property named ‘browser’ is done on the first line of the method, by calling ‘System.getProperty()’. If the value is not specified (either via the IDE or the command line, depending on how the tests are configured), a NullPointerException will be thrown. That is a hint that you forgot to set the ‘browser’ property, or that you misspelled the name of the property. In this case no browser will be open.
If the value of the property was read, a comparison will be made, between the lowerCase value of the property, and a String value representing the browsers the tests support. So, the property value is read. It can be, for example: Chrome, chrome, CHROME, ChROME. It does not matter what type of case is used for each letter. The value of property will be lowerCased and compared to the string ‘chrome’ (all lowercase) on the second line of code in the method. This allows for some flexibility when writing the browser name property, as you don’t need to adhere strictly to a case for each letter. You just need to make sure the property values are from the supported set of values (in the examples in this post these supported values are chrome and firefox).
As you notice, there is a ‘switch/case’ construct in the code. Based on the property value from the ‘switch’, each ‘case’ treats what browser to be open. If the property, in lower case, equals ‘chrome’, inside the corresponding ‘case’ block, first there is a message displayed in the console, just for informational purposes, that the Chrome browser will be initialized. Then, the ‘getChromeDriver()’ method is called, and the result of calling this method will be returned by the current method (‘getDriver()’). This means, that if the System property in lower case was ‘chrome’, the ‘return getChromeDriver();’ is the last piece of code executed from this method, and the method exits, returning the Chrome driver instance.
Similarly, in the second ‘case’ block from the above code, if the lower case value of the ‘browser’ property is ‘firefox’, a message is displayed in the console that the Firefox browser will be initialized. Then, the ‘return getFirefoxDriver();’ code will call the method for initializing the Firefox driver, and make the browser initialization method successfully exit by returning a WebDriver instance (represented by the newly open Firefox driver instance). If the ‘browser’ property value in lower case was ‘firefox’ this will be the last line of code that will execute from this method.
If the ‘browser’ property was specified, but its value in lower case was none of the already mentioned ones (‘chrome’ or ‘firefox’), it means that either there was a misspelling, or that whoever tries to run the test wants to do so on an unsupported browser. For this situation instead of initializing one of the supported browsers, it’s best to not initialize any. This is just so that the person who is trying to run the tests is aware that they did not specify the correct browser name. In the code above, to accomplish this, a Java RuntimeException is thrown, with a message reflecting the situation (that the browser specified is unsupported).
To sum it up, the above method can provide one of the following four outcomes: a NullPointerException if the System property with name ‘browser’ has not been set, a ChromeDriver instance, a FirefoxDriver instance, or a RuntimeException if the value of the ‘browser’ property is not ‘chrome’ or ‘firefox’.
Calling this method from a test class requires to first create a variable or field of type WebDriver, to which the result of calling the method will be stored. In this case, a field is created:
private WebDriver driver;
The actual call to the method is done:
driver = browserGetter.getDriver();
This way, the browser is started, and the WebDriver instance stored in the ‘driver’ variable allows browser interactions from your tests.
And this concludes this series of posts on setting up your browsers and how you open them. Recommended further reading on the topic of System properties:
https://docs.oracle.com/javase/10/docs/api/java/lang/System.html
https://docs.oracle.com/javase/tutorial/essential/environment/properties.html
https://docs.oracle.com/javase/tutorial/essential/environment/sysprop.html .
The BrowserGetter class where the browser initialization method can be found is:

